Welcome to Social Paper! This is one in a series of posts that explain how to use Social Paper tool on the Commons. For information on Reading, Commenting on and Sharing Papers, click here.
Step 1: Create New Paper
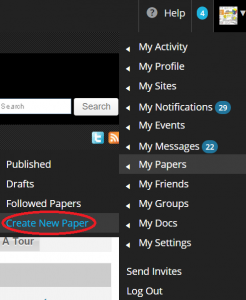
If you’re ready to start your paper, the fastest way to do so is through the profile drop-down menu. Just scroll down to My Papers, then move your cursor to and click Create New Paper.
If you use the main page navigation or the drop-down menu on the top left side of of the page, you will be taken to the Papers page (Social Paper). To create your paper, click Create New Paper.

Step 2: Give Your Paper a Title
Wait for the paper to load all the way (remember, we’re still in beta), then click on the row where Title appears replacing it with the title of your paper. Your title will automatically become part of the URL of the paper.

Step 3: Start Writing
After you’ve given your paper a Title, click on “Just Write…” and do just that!

You can apply some rich text formatting to your paper by highlighting your text. You have the option to make it BOLD, italicized, strike through text, create a hyperlink, add a blockquote, or change the text to H2 or H3.
Add a Block
![]()
When you are typing and hit enter, a pop-up will appear that suggests to “Add a block.” Click this to add multimedia, a horizontal line, or a page break. You can insert media from a file on your computer or media library, or insert from URL. Adding a horizontal line will break up your text within the page, and adding a page break will create a new page for the content you are able to add.

Step 4: Update the Paper Settings
 To access your paper’s settings, click on the gear icon on the bottom left side of the paper.
Description
Add a short description of your paper, which will appear alongside your paper in the Social Paper directory (If you leave this box blank, an excerpt will be used instead).
Access
Decide whether you want your paper to be Public or Private in regards to reading and commenting. If you select Private, you can add readers who are members of the CUNY Academic Commons, who will receive alerts when there is activity on your paper.
Groups
You can also associate your paper with one or more groups by entering the group’s name.
Remember that anyone you’ve listed as a reader will receive notifications when there is activity on your paper, such as updates and comments.
When you have selected your settings, click on the gear icon again to toggle the Setting panel off so that you have more room for your writing.
Step 5: Add Tags
Include tags that are relevant to your paper (click on the tag icon displayed below in Step 6) so you can organize your work and allow your readers to find it more easily. In the example to the right, if you are writing a book review for your MALS 745 class and the book is on digital computing, you could include these as tags.
Step 6: Save & Publish Your Paper
The final step is to save and publish your paper. You have the ability to save your paper as a draft or publish it. Your paper will not be visible to others while it is saved in Draft form.
While this is the last step in this post, we realize that these papers are living documents with the strong potential to be edited, re-saved, unpublished and saved as a draft, and republished. Do not feel you have to publish your work until you are ready. That said, the point of the Social Paper is to get feedback, which is a very important part of the writing process — so be social and share!
Social Paper Codex Pages
- Social Paper
- How to Create a Social Paper (current page)
- How to Share and Follow Social Papers
- How to Comment on Social Papers


