Archive | Site Plugins

How to use plugins to customize a Commons Site

FancyBox Plugin for WordPress

Fancybox is an easy to use plug-in that gracefully enlarges images in your posts and pages when a reader clicks on them.

When you upload an image to your blog using the “Media>>Add New” tab in the dashboard, WordPress automatically saves that image in up to four different sizes: thumbnail, medium, large, and full-size, depending upon the image’s original size. (When you “Insert into Post,” you can see which sizes are available.)

If you activate Fancybox, and a reader clicks on the image, a popup will display the image in its largest available size.

The plug-in will automatically convert all images in your blog that don’t have pre-existing links. If you don’t want the Fancybox effect on some images (perhaps you are displaying them in their largest size already), you can delete the link, and the popup will not appear. (This can be done best in the HTML view).

The plugin has a page with many customizable settings to change the borders, zoom rates, overlay color and opacity, but the default settings work fine for starters.

One warning: Fancybox does not work well with posts that use WIKI Inc plugin to “include” wiki page content. If the wiki page that you include has images in it, the Fancybox effect will not work.

Here is a post with a thumbnail image:

And when you click on the thumbnail, Fancybox does its magic:

Have fun with this useful and easy to use plugin!


Create a FAQ Page on Your WordPress Site

Raygun Web Design/Development

The Q & A WordPress plugin lets you easily add a configurable question & answer dialog on your site. First you create individual “FAQ” custom posts, where the post title is the question, and the post content body is the answer. You can assign categories to each FAQ post, and when you want to display your questions and answers, you use a simple short code. This is a neat way to provide a quick, compact Q&A dialog for your readers to quickly get onboard with new concepts, or create a review page that re-enforces important concepts.

Getting Started

When you activate the plugin, you’ll see a new section (“FAQs”) added to your dashboard (see image, left). Click on “Add New” to add a new Question & Answer. Remember – the title is the question, the content is the answer. You’ll need to repeat this process for each Q & A you add. To display your compiled list of questions and answers, use the following short code in any page or post:

Optionally, you can qualify the short code with a category, which will display only the Q&A’s in that category. That code looks like this (where “faq1” is the name of one of your categories):

Short codes can be sensitive to copy/paste operations – so if you have troubles (like I did), retype the short code rather than pasting what you copied.

The answer to your question is the post content, and it can contain images, links, text, and embedded video – anything that a normal post or page can contain. If you have any problems, let us know at the Commons or check out the plugin’s own support forum.

Settings

If you go to your Dashboard and click Settings>>Q&A, you should see the following options that help you configure how you want your FAQs to appear. If you want, you can create a FAQ page dedicated to questions and answers. Or you can simply integrate your Q&A’s within posts and pages. (Hover over each question mark in your dashboard for handy tooltips that let you know what each option does).

Here are a couple Q & A’s to show what the plugin can do:

How do Cats Purr?

from Wikipedia:

The mechanism by which cats purr is ambiguous. This is partly because the cat has no unique anatomical feature that is clearly responsible for the sound.[2]  One hypothesis, backed by electromyographic studies, is that cats produce the purring noise by using the vocal folds and/or the muscles of the larynx to alternately dilate and constrict the glottis rapidly, causing air vibrations during inhalation and exhalation.[3] Combined with the steady inhalation and exhalation of air as the cat breathes, a purring noise is produced with strong harmonics.[4] Purring is sometimes accompanied by other sounds, though this varies from cat to cat; in the audio samples that accompany this article, the first cat is only purring, while the vocal production of the second cat contains low level outbursts sometimes characterized as “lurps” or “yowps”. Domestic cats purr at a frequency of 25 to 150 vibrations per second. Eklund, Peters & Duthie (2010), comparing purring in a cheetah (Acinonyx jubatus) and a domestic cat (Felis catus) found that the cheetah purred with an average frequency of 20.87 Hz (egressive phases) and 18.32 Hz (ingressive phases), while the much smaller domestic cat purred with an average frequency of 21.98 Hz (egressive phases) and 23.24 Hz (ingressive phases). Schötz & Eklund (2011) studied purring in four domestic cats and found that the fundamental frequency varied between 20.94 and 27.21 Hz for egressive phases and between 23.0 and 26.09 Hz for ingressive phases. Schötz & Eklund (2011) also observed considerable variation between the four cats as regards relative amplitude, duration and frequency between egressive and ingressive phases, but that this variation generally occurred within the same general range. For film clips of purring waveforms, see purring.org. In a follow-up study of purring in four adult cheetahs, Eklund, Peters, Weise & Munro (2012) found that egressive phases were longer than ingressive phases in four cheetahs. Likewise, ingressive phases had a lower frequency than egressive phases in all four cheetahs. Mean frequency were between 19.3 Hz and 20.5 Hz in ingressive phases, and between 21.9 Hz and 23.4 Hz in egressive phases. Moreover, the amplitude was louder in the egressive phases in four cheetahs.


What Was the Bathtub Hoax?

from Wikipedia:

On December 28, 1917, an article titled “A Neglected Anniversary” by H. L. Mencken was published in the New York Evening Mail. It claimed that the bathtub had been introduced into the United States as recently as 1842, the first ones having been made of mahogany lined with lead. The article went on to describe how the introduction of the bathtub initially was greatly discussed and opposed until President Millard Fillmore had a bathtub installed in the White House in 1850, making the invention more broadly acceptable. The article was entirely false but was still being widely quoted as fact years later, even as recently as January 2008 when a Kia TV ad referenced the story with no mention of its fictional nature.


“Social Stickers” WordPress Plugin

Interested in showcasing your social media networks on your site? We recommend using “Social Stickers,” a simple plugin that allows you to show which social networks you use. There are over 50 social networks to choose from, including: Twitter, Facebook, Instagram, Tumblr, and YouTube. You can also select from one of five themes, which change the visual style of the social network icons.

Follow these steps to display social networks on your CUNY Academic Commons WordPress site:

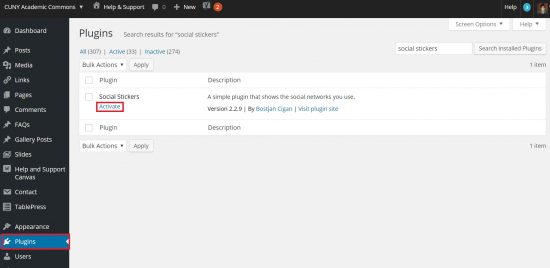
  1. Click on the “Plugins” menu in your WordPress dashboard, search for “Social Stickers” in the directory, then click “Activate” under the Social Stickers plugin.
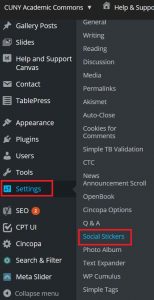
  2. social stickersCustomize the settings in Settings>Social Stickers (*Please note – you will need to enter your username(s) before you can pick your theme).sticer1
  3. Add the widget to one of your sidebars or footers in Appearance>Widgetswi

Your social networks should now display on your site and look something like this:

this

“Sociable” and “Share This” WordPress Plugins

Social Media icons make it easy for readers to share the content they find on your blog.  One click and your readers can share your posts and pages to a wider audience.  (Users will be asked to sign into their social media accounts, if not already signed in.)

The Commons has two WordPress plugins that manage social media icons on your posts, Sociable and Share This.  Sociable has a full-featured options panel that allows full icon configuration, including sizes, styles, and placement.   Here is a video introduction to Sociable.


Not to be outdone, Share This has some very detailed instructions that can be found here.  One nice feature of Share This is that it allows for “Multi-Post” sharing within your blog, so that users remain on your site while they share to multiple sites:

So which to choose?  Check them both out and see which one you prefer.

Meta Slider Plugin

meta sliderMeta Slider plugin is simple to use and lets you choose between four different “types” of sliders – Flex, Nivo, Coin, and Responsive.  Each type is responsive, and gracefully changes sizes for different types of devices, and offers various features for layering and transitions.  You can easily swap between the four types to find the one that suits you.

If your theme does not include functionality for a slider, you previously had only three choices:

  • Rotating Post Gallery – this is the plugin the Commons uses on its Home page.  It has many great features, but it has several drawbacks: it is not responsive, and it is a widget-only plugin – you need a widgetized area to display it.  It also only allows one slideshow per site.
  • Revolution Slider – This plugin is great on a single site, but it is written in such a way that its powerful layering functionality doesn’t work on the Commons.  You can create great slides, but you can’t layer them with captions.  It allows multiple slideshows per site, using convenient shortcodes, and offers many different types of sliders and effects.
  • EasyRotator for WordPress – this is also a great plugin, but it requires that maintain your slides using an external Adobe Air application, which you need to install on your computer. It also allows multiple slideshows per site, using convenient shortcodes.

The Meta Slider addresses the shortcomings highlighted above.  It allows multiple slideshows per site, using convenient shortcodes.  It doesn’t require any external application, and you can layer your slides with rich text formatted with HTML.  It’s simple to quickly set up an attractive slideshow on any page or post, or on a text widget in one of your sidebars.

meta slider tabGetting Started

  • First, decide on the dimensions of your slider for non-mobile devices.
  • Add the images to your media library that correspond to these dimensions. Meta Slider does a good job scaling up and down – but to avoid distortions and loss of sharpness, it’s best to get your image sizes close to your full size.
  • Click on the Meta Slider tab to create a slideshow.
  • Click on the “Add Slide” button to see the images in your media library. (You can also upload more images at this stage as well.)  Choose the ones you want to include.  Hold down the shift key and select multiple images.  You will see them checked.  Save and preview.  (You can always add or remove more slides later.)
  • Choose a slide type (i.e. Flex, Nivo, Coin, and Responsive) – each has a list “Advanced Settings” for further configurations.
  • meta slider settingsEnter the slide dimension you’ve decided upon. (this should be the largest size you expect to display on your page – it will scale down on different devices)
  • Optionally, add some caption heading and body with links – certain slider types are better for this (Nivo, Flex).  Some HTML is parsed, so you format as needed.
  • To create another slideshow, simply click on the “+” sign in the Slideshow tab.
  • Each slide will have a automatically generated shortcode.  Simply copy and paste into your post or page.

Tutorial

This five minute tutorial should get you up and running quickly:

Hope you enjoy this plugin!

Yoast WordPress SEO

yoast SEO

Yoast WordPress SEO is a powerful plugin that helps improve the chances that your site’s content will be discovered by search engines. The plugin “goes the extra mile” to make your WordPress content more accessible. It automatically adds OpenGraph meta tags to your content based on the keywords and descriptions you enter. You can see the tags it adds if you do a “view source” on your page or post. It is typically 20 or 30 lines from the top. See below for an example:

seo tags

If you are not that familiar with SEO (Search Engine Optimization), there is a great post recently published in the Emerging Tech in Libraries site on the Commons called Gentle SEO Reminders that covers some of the basics and is a great introduction.

Once activated, the plugin creates a new form section on your page or post admin screen:

yoast form

The plugin claims to help you write better content by having you choose a focus keyword and description. It automatically analyzes if this keyword is found in the article heading, page title, the url, description, and the page content, and suggests ways to improve.

There are many other settings that are available, and these are documented on the plugin’s website. You can set up default templates that auto-populate some meta tags so that you won’t need to go back to every page and post of your site and fill in the data. There is a lot of functionality to explore, but even if you just use its rudimentary features, the plugin seems to provide great ways to improve your site’s search engine results.

Embedding Scribd Content

scribd-logoScribd bills itself as a “personal digital library” and provides both a premium monthly subscription plan (with access to over 400,000 books) and free access to user uploaded content.  Many Commons members take advantage of the free upload and storage Scribd offers, and embed PDF content such as CVs, research, syllabi, or the first couple chapters of a book directly into their WordPress sites.

The WordPress embed code that Scribd provides only works for users of WordPress.com or members of the Commons who activate the JetPack plugin.

It is easier to a built-in shortcode that is active on all Commons WordPress sites.  You’ll need two parameters: doc and key.  These are readily found in the WordPress embed code that Scridb provides.

Here is an example of the Common’s Scribd shortcode.  Simply type it on a new line of a WordPress post or page with your doc and key.  Or simpler still, just make a slight modification to the Scribd embed code (described further, below).

scribd_shortcode

How do I Find the Parameter Needed in the Shortcode?

Each item on Scribd has embed information.  It is sometimes a little hard to find.  Here are some screenshots to guide in the process.

  • First, look for the “Share” icon at the top right.  Click it to get a dropdown of ways to share the item.  Select “Embed.”

scribd embed1

  • Then you will see screen that lets you configure the way your content will appear on a page (i.e. size, links, recommendations).  But most importantly, you need to click on the link “WordPress” (highlighted below, in red).
  • scribd embed twoOnce you click on the WordPress link, you will have all the information you need.  This is a screenshot of what Scribd Provides:

scribd embed 3

(Once again, this embed code only works on WordPress.com sites or sites that have JetPack plugin activated.)

Just Add Four Characters and You’re Good to Go!

On the Commons, all you need to do is copy the embed code and add “-doc” after “[scribd” – that is, just change  “[scrib id=….” to “[scrib-doc id=….” and you are good to go.  It will embed into your Commons WordPress post or page.


Create Newsletters from Your WP Site with MailPoet

mailpoetYou can now create fully configurable newsletters from your Commons WordPress site with the “MailPoet Newsletters” plugin.  Find it on your dashboard (Plugins>>Installed Plugins) under its old (and not very catchy) name “Wysija Newsletters.” (The acronym stands for “What You Send Is Just Awesome.”  The plugin has since been renamed “MailPoet.”)

MailPoet (or “Wysija“) lets you use WordPress to build rich newsletters, either ad hoc using the familiar WP interface,  or by interacting with existing posts on your site.  You can manually drag and drop posts into a newsletter or schedule weekly or monthly newsletters that automatically pick up your latest content based on category.  Newsletters can include images, links, and social icons, and be designed from a number of templates.

Newsletters are sent directly from your site to lists of subscribers who you build via the plugin interface.  Lists can be derived from those who subscribe to your blog, or manually, or even by importing from a CSV file comprised of “email”,”lastname”, and “firstname” columns.

This is a great way to garner interest in your site and keep subscribers aware of what’s going on.

mailpoet tabGetting Started
Once you activate the plugin on your dashboard, go to “Newsletters.”  You will see a basic newsletter template with four sections – you can use or delete any of these sections, or you can elect to use a totally different mailpoet themestemplate or “theme.”  (You can easily upload a number of free “themes” by clicking on “Add more themes” button.)  Drag them over to the canvas and start configuring your newsletter.  To add content from your posts, go to the Content tab and drag the type of content you want over to the canvas.  For example, if you want to add an excerpt from one of your posts, drag the “WordPress post” block over to a text area and drop it.  You will then be presented a list of all posts that you can select from.  Select one and if it has an image, re-size it appropriately by clicking on the lower right corner and expanding or contracting its size.  Other content options include “Title & Text,” “Dividers,” and “Social Icons.”

Once you get the hang of it, it is very easy to design a neat looking newsletter.

There are many “Settings” options that help you further configure your newsletter and email clients, and even a widget that lets viewers auto-subscribe.

Take a look and if you have questions, let us know at WordPress Help!  Enjoy!


Quick Video To See What’s Possible

http://vimeo.com/35054446

ChartBoot for WordPress

chartbootThe ChartBoot for WordPress plugin makes it easy to add a wide variety of charts to your site’s pages and posts.  The available styles depend upon the kind of data you paste into the initial text box.  You can create simple bar charts, line charts and pie charts, or if you include a date and several variables, you can create an interactive “trend” chart.  Each chart can be easily customized with headers, fonts, and colors.

chartboot iconGetting Started

After you activate the plugin, no settings are necessary.  You’ll see that an icon appears on you edit dashboard.  After clicking the icon, a popup screen will appear with four buttons.  See image below:

chartboot API

Follow the four steps below to create a chart:

Imchartboot importport Data

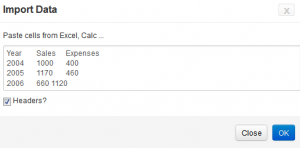
Your data needs to be in some kind of spreadsheet.  Copy the data, including the headers, but you probably will not want the totals.  Paste your data into the text box shown on the right.

chartboot typesSet Types

This screen will automatically show your data field names – use the drop down to configure whether the field is text (“string”), number, or date.

Edit Chart

The plugin does a brief analysis of your data and provides some recommended chart types.  You can pick one of these, or click “More” for more options.  Your data will not support all chart types, and if you pick one that will not work, you’ll get an error message.  When you select a box, your potential chart will appear in a preview box on the right. The subsequent tabs on this screen let you customize a chart to your liking.  Features include heading, font size and family, background colors, and axis choice.  Make your choice and view how they look on the preview box.chartboot edit

Send to WP

This is the final step in the process.  When you click the box, the plugin generates the shortcode that creates your chart.  Make sure you are happy will all the steps above, since you’ll not be able to go back to the plugin’s API to edit your chart once it is generated.  You could try to decipher the shortcode and modify it, if you know what you are doing, but more likely you will find it easier to just start fresh and repeat the steps above.  Here is the shortcode generated for the sample chart:

chartboot shortcode

Google Calendar Events

google calendar eventsThe Google Calendar Events plugin lets you embed one or more Google calendars into your WordPress site, displaying events in a calendar grid, or as a list.   The plugin uses feeds to aggregate events from various sources.

Getting Started

Once activated, the plugin will create a new entry on your Admin “Settings” where you add your calendar feeds.  You can add several here, and later select the ones you want to display on a post or page (using a shortcodes) or in your sidebars using a widget.

feeds

The “Settings” page for the plugin has many more options, including its own “Event Display Builder” which lets you customize how events are displayed when the mouse rolls over a calendar date.  These settings are specific to the individual feed you are working with.  There are many conditional shortcodes that can be implemented here to ensure you display exactly the kind of events you want.  For example, you can customize the feed to only display all day events which are not ended.

calendar3How to Find Your Calendar Feed URL

Go to your Google Calendar.  In Chrome, you’ll probably see it as an option on the toolbar.  Click on the highlighted down-arrow, and then click on “Share this Calendar.”  You will be taken to page where you can make your calendar public.  To use this plugin, your calendar must be public.

Then click on “Calendar Details“, highlighted below:

calendar details On this page you will find a bunch of details about your calendar.  Scroll down the page until you find “Calendar Address.”  Click on the orange “XML” icon.

clickxml

A box will popup containing the feed URL you need.  Copy this and go back to the Google Calendar Events plugin “Settings” page on your WP Admin dashboard.  Go to the “Add a Feed” (pictured above) and paste it into your Feed URL textbox.

Display Events on Posts or Pages, Using a Shortcode

Simply insert the following on a new line to display the default calendar:

[google-calendar-events]

There are four parameters which can be used to customize the appearance:

  •  id – a comma-separated list of the feed IDs you want to display (if this parameter is omitted, if will display all)
  • type – there are four possible values: list(events displayed in a list), list-grouped (events displayed in a list, grouped by date), grid (events displayed in a calendar grid for the current month), and ajax (events displayed in a calendar grid, with the ability to change months via AJAX)
  • title – when you roll your mouse over a calendar date, this will display as the title in the tooltip box that displays the events for the day
  • max – the max number of events to display

Probably the most noteworthy parameter here is type=”ajax”.  If you don’t use that, you will not be able to flip back and forth between months.  Also note that if there are no events in the coming months, the forward arrow will not appear.  (And conversely, if no previous events, the previous arrow will not show).

Example:
[google-calendar-events id=”1, 3″ type=”ajax” title=”Events on” max=”10″]

gce widgetDisplay Events Using a Widget

Once activated, you’ll notice that a widget called “Google Calendar Events” has been added.  Simply drag it over to the widget area of your choosing and configure. The widget provides the same options available with the shortcodes, described above.

Styling Your Event Calendars

If you want to take a shot at changing the way your calendar looks, and know a little CSS, you can play around with plugin’s stylesheet, attached below.  It’s pretty well documented.  Find the particular rule you want to override and paste it into Appearance>>Custom User CSS.

.gce-page-grid .gce-calendar .gce-caption{ /* Caption at top of calendar */ color:#333333; text-align:center; }

.gce-page-grid .gce-calendar{ /* Main calendar table */ width:100%; border-collapse:collapse; border:1px solid #CCCCCC; color:#CCCCCC; }

.gce-page-grid .gce-calendar th{ /* Day headings (S, M etc.) */ border:1px solid #CCCCCC; text-align:center; width:14.29%; padding:0; }

.gce-page-grid .gce-calendar td{ /* Day table cells */ border:1px solid #CCCCCC; text-align:center; height:80px; vertical-align:middle; padding:0; }

.gce-page-grid .gce-calendar .gce-has-events{ /* Table cells with events */ color:#333333; cursor:pointer; }

.gce-page-grid .gce-calendar .gce-event-info{ /* Event information */ display:none; /* Important! */ }

.gce-page-grid .gce-calendar .gce-day-number{ /* Day number span */ font-size:2em; }

.gce-page-grid .gce-calendar .gce-today{ /* Table cell that represents today */ background-color:#DDDDDD; }

.gce-page-grid .gce-calendar .gce-next, .gce-page-grid .gce-calendar .gce-prev{ /* Previous and next month links */ cursor:pointer; display:inline-block; width:3%; }

.gce-page-grid .gce-calendar .gce-month-title{ /* Month title */ display:inline-block; width:90%; } .gce-page-grid .gce-calendar th abbr{ /* Day letter abbreviation */ border-bottom:none; } /* PAGE LIST */

.gce-page-list .gce-list p{ /* Each piece of information in the list */ margin:0; }

.gce-page-list .gce-list p span, .gce-page-list .gce-list div span{ /* The text displayed before each piece of info, \’Starts:\’ for example */ color:#999999; }

.gce-page-list .gce-list .gce-list-event{ /* The event title */ background-color:#DDDDDD; } .gce-page-list .gce-list .gce-list-title{ /* The title (not the same as event title) */ font-weight:bold; }

.gce-page-list .gce-list ul{ list-style-type:none; margin:0; padding:0; } /* WIDGET GRID */

.gce-widget-grid .gce-calendar .gce-caption{ text-align:center; }

.gce-widget-grid .gce-calendar{ /* Main calendar table */ width:100%; border:1px solid #CCCCCC; border-collapse:collapse; }

.gce-widget-grid .gce-calendar th{ /* Day headings (S, M etc.) */ width:14.29%; border:1px solid #CCCCCC; text-align:center; }

.gce-widget-grid .gce-calendar td{ /* Day table cells */ color:#CCCCCC; width:14.29%; border:1px solid #CCCCCC; text-align:center; }

.gce-widget-grid .gce-calendar .gce-has-events{ /* Table cells with events */ cursor:pointer; color:#666666; }

.gce-widget-grid .gce-calendar .gce-today{ /* Table cell that represents today */ background-color:#DDDDDD; }

.gce-widget-grid .gce-calendar .gce-event-info{ /* Event information */ display:none; /* Important! */ }

.gce-widget-grid .gce-calendar .gce-next, .gce-widget-grid .gce-calendar .gce-prev{ /* Prev and next month links */ cursor:pointer; display:inline-block; width:5%; }

.gce-widget-grid .gce-calendar .gce-month-title{ /* Month title in caption at top of table */ display:inline-block; width:80%; }

.gce-widget-grid .gce-calendar th abbr{ /* Day name abbreviations */ border-bottom:none; } /* WIDGET LIST */

.gce-widget-list .gce-list p{ /* Each piece of information in the list */ margin:0; }

.gce-widget-list .gce-list p span, .gce-widget-list .gce-list div span{ /* The text displayed before each piece of info, \’Starts:\’ for example */ color:#999999; }

.gce-widget-list .gce-list .gce-list-event{ /* The event title */ background-color:#DDDDDD; }

.gce-widget-list .gce-list .gce-list-title{ /* The title (not the same as event title) */ font-weight:bold; }

.gce-widget-list .gce-list ul{ list-style-type:none; margin:0; padding:0; } /* TOOLTIP */

.gce-event-info{ /* Tooltip container */ background-color:#FFFFFF; border:1px solid #333333; max-width:300px; }

.gce-event-info .gce-tooltip-title{ /* \’Events on…\’ text */ margin:5px; font-weight:bold; font-size:1.2em; }

.gce-event-info ul{ /* Events list */ padding:0; margin:5px; list-style-type:none; } .gce-event-info ul li{ /* Event list item */ margin:10px 0 0 0; }

.gce-event-info ul li p{ /* Each piece of information */ margin:0; }

.gce-event-info ul li p span, .gce-event-info ul li div span{ /* The text displayed before each piece of info, \’Starts:\’ for example */ color:#999999; }

.gce-event-info .gce-tooltip-event{ /* The event title */ background-color:#DDDDDD; font-weight:bold;

List Pages Shortcode

flicker_poles_6594723627_6e3dcf6137_zThe List Pages Shortcode plugin comes in handy if your site has a lot of pages and you want a quick way to make them accessible.  As its name suggests, it provides an easy-to-use shortcode with a bunch of optional parameters to list out links to your pages. Just type in the shortcode on a new line on the page where you want the list to appear.

You can exclude pages from the list, you can only show “child” pages of the current page, and specify how deep your want to go (grandchildren, great-grandchildren…), or you can only show siblings of the current page (pages with common ancestor pages).  You can sort the list according to specified fields (post_author, post_title, ID, post_date, etc. ).  And you can include a page excerpt (excerpt=”1″).  This plugin works well with the “Page Excerpt” plugin, which allows you to create a excerpt that summarizes and teases your readers to explore the page.  To exclude the current page, use exclude_current_page=”1″.  If you plan to do some custom styling of your list using CSS, you can add a class (class=”my_page_list”).

Here are some sample ways to use the shortcode:

listpagesAnd here are some of the parameters that you can use:

listpages2

An explanation of how to use these parameters can be found here.

This plugin is a great way to organize and manage content on your site.

WP Post to PDF

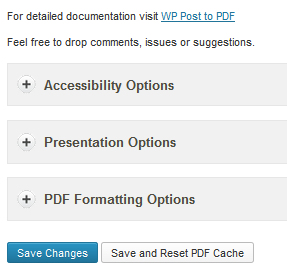
postToPdfThe WP Post to PDF plugin lets your readers download your page or post content to a PDF.  You can control if this function should be available to everyone, or just to logged in users.  Installation is a snap.  The plugin adds an entry to your admin dashboard “Settings” called postpdf1“WP Post to PDF.”  Here you can configure the plugin to your liking.  You can determine what pages and posts you want the PDF export icon to appear, and how it should look like.  You can exclude pages and posts, and determine how to display author information.

The plugin has a default logo that is easily changed on a single site installation, but which is problematic to configure on the Commons.  Follow this post to see if there is a resolution, or stay tuned.  Maybe we can globally replace it with the Commons Logo, or simply not display it.replaceLogoWhen installed, your page or post will look something like the screenshot below.  Just click on the icon to download a PDF version.
pdf samp

And the downloaded PDF will look like this, depending on how your configure your layout:
sample pdf

Column Shortcodes

column shortcodesColumn Shortcodes is a neat plugin that lets you divide your post or page content into columns wherever you want, using easy to use shortcodes.  You can swap in and out of various column layouts (there are eleven to choose from), and end a row using the “(last)” shortcode.

column icon2Once installed, the plugin adds an icon to your edit dashboard.  Click on the icon and choose a layout.  Enclose the content between the two parts of the automatically generated shortcode, and continue across the row.  If you choose, you can end the row with the “(last)” shortcode.

column shortcs

This is a easy way to create interesting layouts for your pages and posts.  The plugin also provides an easy way to add padding to columns.  Be sure to enter the padding first (put your cursor on the box, and add a pixel value for the padding) if you need it, and then select a column shortcode.

column options

Next Page Buttons Plugin

flickr_bulb_7232992872_a756e282d4_zThe NextPage Buttons plugin lets you break up your post or page content into pages.  This is functionality that was once in WordPress core, but was removed.  So use this plugin with the knowledge that it might not work forever.  It is easy to use, though it is a manual procedure.  Scroll through your page and post, and where you want to break into a new page, simply click the “Next Page” icon pictured below:

nextbuttonsiconYour content will be broken up into pages, and at the bottom of each page you will see navigation buttons like these:

nextButtonsClicking on “Single Page” will break the pagination and display all your content on one page.  You can scroll throughout.  But clicking back on a page number will reverse this, and break your content into pages.

EasyRotator for WordPress

easyrotatorThe Easy Rotator for WordPress plugin provides an easy way to add a customizable slider to a page or post, or to a widget area.  You can add as many distinct sliders as you want to your site, and use many different template styles.  Animation can be customized for each separate slider, and depending upon the template you choose, text and links can be added to suit your needs.  This is a great plugin to use if you’re using a basic theme like Twenty Twelve and want to embellish your content with some dynamic images.  Pictures can be selected from your computer, your WP media collection, or from the images you set as “featured” on your posts.

In case you are wondering, a slider is a set of images that cycle through your page, post, or most probably, your home page.  In most cases, you can configure your slider to fade or slide, and link to a page or post that is displayed.  You can configure how long the image stays on the page, and you can control what text should overlay the image (if any).   Sliders are a good way to showcase the contents of your site. 

Getting Started

Setup is a little different for this plugin.  Once activated, you should see the following box at the top of your dashboard:

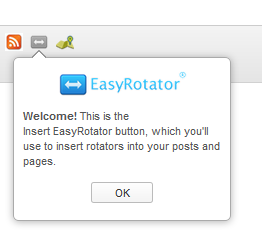
easyrotatorInstall2Click on the install button, and follow the instructions to install EasyRotator’s editor application onto your computer.  This also involves installing Adobe Air.  This one time process takes a couple minutes to complete.  Once done, you will see a new icon when you go to edit a page or posteasyrotatorbutton.  Click on the button to add a new rotator or to edit an existing one.

Getting Help

easyrotatorhelp1This plugin comes with a great help panel which can be accessed from your dashboard menu under EasyRotator tab.  It includes screenshots of the various screens you’ll need to use to set up the API and to create and customize your sliders.  It may seem overwhelming at first, but I think you’ll find the plugin is fairly easy to use and awesome in what it can do.  The plugin comes with a premium “Pro” version which the Commons currently does not support.  And it also includes a widget that you can use in your sidebar.

Page Excerpt

excerpt_3421668561_4e72589586_mThe Page Excerpt plugin gives pages the same excerpt functionality as posts.  Excerpts are “optional, handcrafted summaries” that can tease your readers into exploring your content further.  After installing this plugin, a new text box will be added to your “Page Edit” dashboard.   If you don’t see it, click on “Screen Options” and ensure that the checkbox entitled “Excerpt” is checked.  See screenshot below:

excerpt1

Scroll down on your “Edit Page” and you should see the following:

excerpt2
You can add text, but if you want to include images or links, you’ll have to do so with HTML.

So how is the page excerpt displayed?

If you have developed a child theme on the Commons, you can include (and customize) the following PHP code into one of your templates to display page excerpts:

<?php the_excerpt(); ?>

But more likely you’ll use “Page Excerpt”  in conjunction with another plugin that is available on the Commons – “List Pages Shortcode.”  As its name suggests, this plugin lets you use a shortcode to list selected pages (and optionally their excerpts).  For more information, see List Pages Shortcode on the Commons Codex.

Edit Flow

editFlowThe Edit Flow plugin is great for a WordPress site that is being used to publish a journal or newsletter/periodical or research project.  It provides a framework to collaborate with team members and plan for issues.  Its built in calendar displays article progress from pitch to publication.  The editorial flow includes a record of all comments, and editorial metadata such as topic, first draft date, word count, images, etc.

After activating the plugin, you’ll notice three new tabs on your Dashboard, “Story Budget”, “Calendar”, and “Edit Flow”.  There are eight components to Edit Flow which may be turned on or off.  See snapshot below for brief descriptions of what each one does:

editFlowSettings

Each of these components can be configured to suit the needs of the team.  You can customize what kind of metadata you want to collect, and what editorial stages you want to track.  This is a very powerful plugin built for specific needs.

Leaflet Maps Marker

leafletThe Leaftlet Maps Marker is a really neat plugin that lets you easily pin, annotate, organize, and share locations using maps from Google,  Bing, and OpenStreetMap.   Using integrated address searches, you can easily locate sites, pin them with hundreds of different pin icons, add popups for each site that include images and text, size, zoom and layer.  You can use shortcodes to easily include your map in any post or page.  And you can include directions and make your locations available via RSS feeds (actually via GeoRSS).

This is a great tool for research, teaching and travel journalism.

Once activated, the plugin creates a new tab on your dashboard called “Maps Marker.”  It’s pretty easy to get started creating a map and using its shortcode to embed it into a post or page.  There are hundreds of options, and mapping APIs, but the basic learning curve doesn’t seem too bad.

Below is an example of what you can do.  If this was an actual embed, you would be able to click on the pins to popup its annotations and associated images.

leaf

Twitter Mentions As Comments

twitter mentionsThe Twitter Mentions As Comments plugin is a neat way to harvest all the tweets referring to your WordPress posts and display them as comments on your site.  The workflow is identical to the comment workflow on your site, and is controlled in Settings>>Discussion.  You configure how notifications, comment moderation, and author whitelists/blacklists work.  The plugin gets the poster’s real name and profile picture and links directly to the original Tweet.  And best of all, it does it automatically.

After activating the plugin, you’ll notice an entry added to your Dashboard Settings tab.  Here you can control the way the plugin operates:

twitterMentionsSettings

If you tweet about your posts, you might what to blacklist your own Twitter account to avoid getting comments from yourself.

For support, check out the plugin’s site on GitHub.

WordPress Google Fonts

googleFontsThe WP Google Fonts plugin is a great way to add different fonts to your site. Many premium themes provide built in font functionality, making this plugin unnecessary.  But for many standard themes, you’ll need a plugin like this one if you want to take advantage of the vast collection of fonts that are available.  To learn more about Google Fonts, check out the Google Font Directory website.

After activating the plugin, you will see an entry has been added to your dashboard settings tab.  Click on it and start adding fonts that you might want to use.  The plugin provides space to add up to six different fonts.

googlefontssettings

Using the form above and checking off elements for the fonts seems to work fine for themes like Twenty Twelve, but at the bottom of the Settings page the plugin provides a little more information about how to configure font use if you find this method has no effect (or if you want to apply fonts to specific posts or paragraphs, etc.) :

Most likely the theme you are using has defined very specific elements in its stylesheet and these may override the generic tags specified above. If you don’t see any changes after checking the style boxes above, you will need to enter custom css into the CSS box. An example of CSS that would be more specific would be:

#container p { font-family: ‘Reenie Beanie’, arial, sans-serif; }

This would define all paragraphs found within a <div id=”container”></div> element. Stylesheets (CSS) can be sensitive and tricky sometimes. If you are new to CSS the w3schools tutorials are a great place to start.

Pinterest Pinboard Widget

pinterest Pinterest Pinboard Widget provides an easy way to integrate Pinterest content into your WordPress site.  Easy to use and to configure, the widget displays content from your Pinterest account, someone elses account, or from the generic “pinterest” account.  Clicking on an image in the sidebar will take you directly to Pinterest site and the pin.  There is an option in the widget to open in a new window to make it easy for your readers to go back to your site.pinterestSettings

This can be used to display recent pins from organizations related to your site.  For example, the Graduate Center has a Pinterest board, and if you paste its account (“gradcenternews”) into the widget configuration, your site will display its most recent pins.

Below is a screenshot of what would appear in your sidebar, using the example configurations.

pins

Regenerate Thumbnails

The Regenerate Thumbnails plugin comes in handy if you want to easily re-size an image’s thumbnail or a set of images’ thumbnails. Simply go to Settings>>Media and change the default size for your thumbnails.

imageSizes

Then you have three ways to use this tool:

  • Go to Tools>>Regen. Thumbnails and change the thumbnail size of your entire collection of images; or
  • Go to Media>>Library and select each image that you want to change by checking its box. Then select “Bulk Actions” and “Regeneration Thumbnails” and click Apply; or
  • Do one image at a time. Hover your mouse over the title of your image. You will see a new option is available called “Regenerate Thumbnail.” Click on the hyperlink, and your thumbnail will be resized.
Regenerating thumbnails individually.

Regenerating thumbnails individually.

If you have posts that are explicitly using the thumbnail size of an image (i.e. have a “hardcoded” url reference), you will have to manually update to the new url.

But if your theme uses thumbnail images automatically when it lists your posts on your home page or on your category archive pages, these will be re-sized automatically. Thumbnails on gallery pages will also be automatically updated.

Some of the themes (especially the premium themes) on the Commons have dynamic resizing functionality built in, and might have a more convenient method for resizing thumbnails. Perhaps this regenplugin won’t be used that often, but it’s good to know that if you are changing themes and things are not looking quite right, or just decide you want to change your thumbnail dimensions, this plugin is ready to use on the Commons, and can save you a massive amount of time. It also has a great support page and the developer is very responsive to questions.

Super RSS Reader

super RSSSuper RSS Reader is new on the list of RSS plugins for the Commons. It is a widget that can easily be placed in your sidebar to display up to five different feeds in a single area. Each feed appears as a tab, and you can easily control how many items are displayed.

What sets this widget off from the others we have installed on the Commons is it’s “ticker animation” feature. You can set the feed to refresh after a configurable number of seconds and control how many items in total you want to display. So for example, if you want to display 5 items at a time in your sidebar, and you want to include the last 15 items in your feed, and you set your screen to refresh after every 4 seconds, you will see three sets of items before they start repeating 12 seconds later.

Configurations

Configurations

Twitter feeds look nice when displayed using this method. (The url for a Twitter feed is – https://api.twitter.com/1/statuses/user_timeline.rss?screen_name=xxx – where xxx is the Twittter user name.)

If you find the news ticker animation effect distracting, you can simply shut it off by de-selecting one check box in the configuration (see above).

Super RSS Reader is purely a widget and all settings are controlled from the widget configuration dialog shown above. If you are looking to display feeds in pages or posts, you can use WP-RSS Import which is also available on the Commons, and which comes with a lot of configurable attributes, and controlled with shortcodes.

Statistics For Your Site

It’s great to quantify your readership, and there are a couple plugins on the Commons that provide interesting statistics, and there is also Google Analytics (see below) , which is perhaps the best at gathering what’s happening on your site.

Google Analytics

Google Analytics is installed on the Commons site-wide, and provides a wide variety of statistics for individual sites. Follow this link to see how it works. Contact us at [email protected], and we’ll set you up to receive activity emails on a daily, weekly, or monthly schedule. Activity is provided in a spreadsheet or PDF, broken down by Pageviews, Unique Pageviews, Average Time per Visit, Bounce Percentage, and Exit Percentage. There’s a lot of customization possible.

Since we have Google Analytics running site-wide, we don’t provide widgets to display individual site stats – you’ll need to receive data via email.

JetPack

What is JetPack?

The Jet Pack plugin is actually a bundle of 16 plugins that have been developed for WordPress.com.  Most are free, others are premium plugins that cost money to use.  Each plugin can be activated or deactivated according to your needs.  If you use a lot of other plugins on your site, you might want to be conservative in what you activate in JetPack – some of your existing plugins may conflict with JetPack’s plugins.  (For example, if you have Simplier IPaper activated on your site, and you try to activate Shortcode Embeds, you will get an error.  You’ll need to first de-activate Simplier IPaper.)

The screenshot below shows JetPack’s main page:

To use JetPack you’ll need to have a WordPress.com account.  This is easy to get, and does not even require starting a WordPress.com blog.  Just register here, get your id/password, and you are ready to activate Jet Pack.

JetPack provides a nice stats plugin that you can use to track your readers.  It also provides Latex support for mathematical notation, and a bunch of other plugins, many of which are similar to other plugins on the Commons.  Take some time and explore.

One of the plugins that’s included in JetPack is called “Stats” and it presents readership data in various graphs, in your dashboard, as shown below:

The Admin bar has a simple graph showing activity, and when clicked, takes you to full details.

StatPress Visitors

The StatPress Visitors plugin was recently installed on the Commons, and comes with two sidebar widgets to display statistics. One shows the most popular posts and pages on your blog and the other shows statistics for today – number of visitors currently online, users logged on, etc.

From your dashboard you can retrieve a lot of detailed information, including statistics about bots, spiders, subscriptions to RSS feeds, popular pages, unique visitors, page views, browser and operating systems, IP addresses, etc.

This is a neat plugin with a lot of bells and whistles, and one worth checking out. Check out their Flickr slideshow:

Creative Commons License

Environment: Reclaim Dev

Branch: 2.5.x

Skip to toolbar