Tag Archives | wordpress

Random Headers and Showcases with the Twenty Eleven Theme

The Twenty Eleven theme is the default theme for WordPress 3.3 and builds on all the great stuff included in its younger sibling, Twenty Ten. Twenty Ten is extremely popular on the Commons, while Twenty Eleven is largely under-used and under-appreciated. Take a look at how you can customize the home page, and see what you think.

Header Images

As in Twenty-Ten, users can use the “Featured Image” function to attach an image to a page or post, and if it is large enough (1000 x 288, or bigger), the theme will automatically use it for the header image. This is really nice for creating distinctive and unique content. But Twenty-Eleven also allows you to load up a bunch of header images and display them randomly or sequentially for pages with no attached feature image. The header image will change on these pages each time the page is refreshed. Go to Appearance>>Header on your dashboard to control these configurations, and add header images.

Showcases

Twenty Eleven lets you customize a homepage that display any number of “Featured” posts. These posts are displayed one at a time, and your readers can cycle through them by clicking a radio button above the content. The featured posts can be all text, all image, or a combination of the two.

To implement a showcase in Twenty Eleven, follow these four easy steps:

Step One – Create a Showcase page

In your WordPress dashboard, go to Pages>>Add New. Provide a name for your page – this could be anything – but to remember what you are doing, maybe call it “Showcase”. Then scroll down to the “Page Attributes” section, where you find the available page templates. Select “Showcase.”

Step Two – Make Your Showcase page your site’s Home page
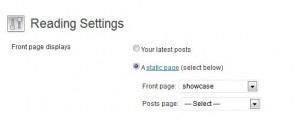
In your dashboard menu, go to Settings>>Reading. There you will find a section that controls what your front or “Home” page displays when first opened. You want your showcase to be your Home page, so select “A static page” and from the dropdown, select your showcase page (from Step One).

Step Three – Make your Featured Posts “Sticky”

Identify which posts you want to appear in your Showcase. Go to your dashboard and edit each of these posts and mark them as “sticky.” You will be able to do this by finding the “Publish” section. Where you see “Visibility: Public” click on “Edit”. This will open up the visibility options. You want the post to be “Public” and you want to check the box that will stick this post to the front page. (You can toggle the “Sticky” box on and off to control which posts you want to feature.)

Step Four – Attach Featured Images (optional)

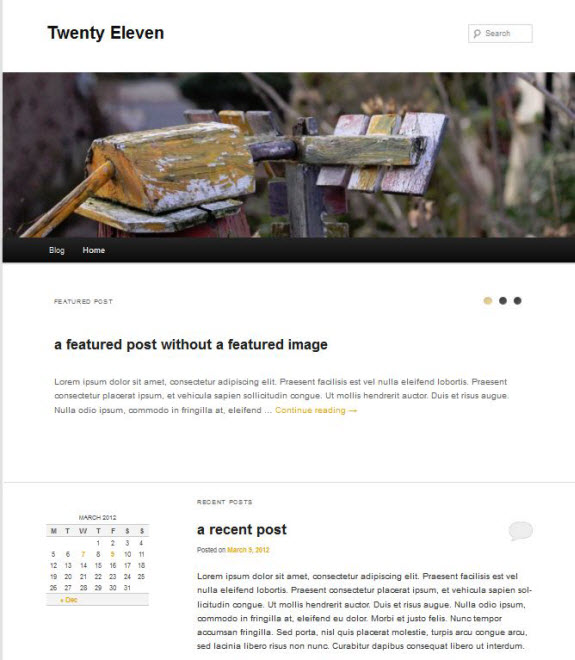
You have now created a showcase, and if you just want you featured posts to appear as simple text, your job is done:

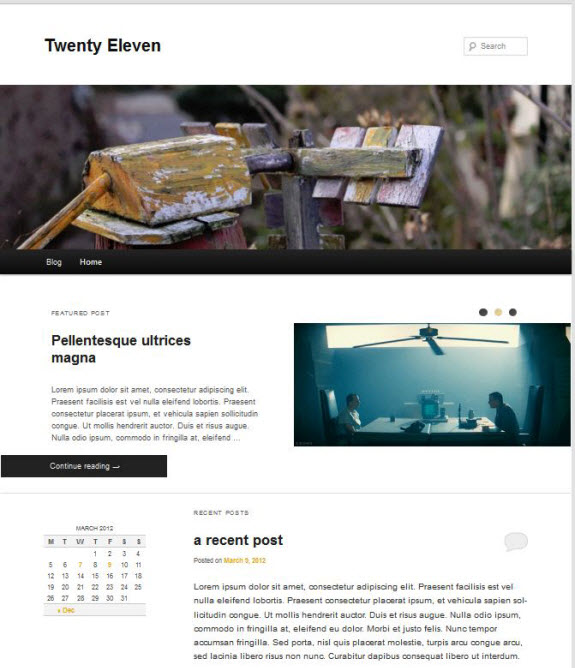
But if you attach a featured image to one of your featured posts, Twenty Eleven will dramatically change the way you showcase appears. You have two options: (1) have one large image (1000 x 288 or bigger) in the showcase, over-layed with the title of the post; or (2) a portion of text and a smaller image, flushed to the right. Both are clickable and will take the reader to the post page.

Screenshot of option (large featured post):

Screenshot of option two (smaller feature post – text and image):

So now the Home page has (from top to bottom) a Title, a header image, and a showcase that displays three featured posts, each differently. Below all this is a section for “Recent Posts” and a showcase sidebar, that you may configure in the Appearance>>Widgets section. It is called the “Showcase sidebar” and is only displayed on the showcase page.

WordPress Tutorials & Links

  • WPCandy tutorials – WPCandy has many useful tutorials that provide tips on configuring your blog.
  • FLOSS – general how-to manual for WordPress (in TWIKI format)
  • WordPress.org – Here you will find complete documentation for WordPress, including available plug-ins and themes and free downloads. As an open source project, WordPress depends on its community to develop plug-ins and themes, and to document each of these by using its Codex, a collection of blog pages which serve up wiki pages that members of the community can collaborate on.
  • WordPress TV Screencast how-tos created by WordPress developers
  • WordCamp NYC 2010 – The folks at WordPress organize “camps” at major cities throughout the year, and they are very interesting to attend. Cheap and highly recommended, if you are interested in WP.

Blogging on the Commons

(excerpt from Matt Gold post)

The Commons has different types of platforms that individuals and groups can use to communicate and collaborate with one another — groups (with discussion forums), blogs, and wikis. So why use a blog, rather than a group?

Blogs offer:

  • A more flexible system of publishing that groups or wikis. The visual appearance of the blog can be altered through the use of themes. The functionality of the blog can be changed by the activation of various plugins
  • A way for non-CUNY users to contribute to the conversation through comments (since only members of CUNY can create accounts on the Commons, only members of CUNY can join groups
  • A more advanced system of privacy. Whereas groups can currently only have three levels of privacy — public, private, and hidden — blogs have five different levels of privacy, all available from the Settings > Privacy menu of the blog dashboard:

Blog privacy settings available on blog dashboard from Settings > Privacy.

You can choose one of the following five options to adjust your blog’s visibility.

  • I would like my blog to be visible to everyone, including search engines (like Google, Bing, Technorati) and archivers;
  • I would like to block search engines, but allow normal visitors
  • I would like my blog to be visible only to registered users from the blog community
  • I would like my blog to be visible only to registered members of this blog
  • I would like my blog to be visible only to administrators of this blog

You may also make individual posts on your blog private and password protected.  See Sarah Morgano’s post How To: Set your blog posts to private for more information.

You can create as many WordPress blogs as you want on the Commons. You can decide on the level of privacy, choose a cool theme, and create posts and pages. Your posts will be broadcast on the Commons Home page, or not, depending upon your preferences.

WordPress Plugins

WordPress uses plug-ins to extend the core functionality of blogs. There are over ten thousand plug-ins which have been developed by the WordPress Community. The Plug-in Directory provides download access to them, and lets you search by keyword and tags.

The Commons provides access to a subset of this huge group of plug-ins. These plug-ins are installed and ready to be enabled. The list of plug-ins changes over time. If you know of a plug-in which you would like to use, but which is not installed on the Commons, send an email to [email protected]. Check out Tweaking Your Site for a listing of popular WordPress plugins. Each entry provides a brief description and a link to a post about it.

How to Activate a Plug-in on a Commons Blog

Activating a plug-in is a one time operation – on the WordPress Dashboard, click on “Plug-ins.” Then scroll down until you find a plug-in you’d like to try out. Click the checkbox and the “Activate” hyperlink. If you don’t like the plug-in or find that it doesn’t do what you want, you can follow the same procedure, by click on the “DeActivate” hyperlink.

WordPress Themes

Themes control the look and feel of your WordPress blog. They can be switched by clicking on “Appearance” tab on your admin dashboard. Thousands of themes have been developed for WordPress, and the Commons provides a couple hundred to choose from. Some are elastic and stretch across the entire width of your screen. Others are fixed width. Others are responsive – they respond to the kind of device being used.  Some have just one column, while others provide two or three columns to use for RSS Feeds, Blog rolls, and navigation. Themes are also categorized by color. WordPress.org offers five different filters to use to search through all their available themes.

With such a variety, how can you choose the right theme for your blog? One way is to simply page through the selections and preview ones that look good. When you are shopping around for themes, there is a preview button available which simulates what you’ll get. If you like it, simply click to activate. Another option is to look at the blogs on the Commons. If you find one that you really like, scroll down to the bottom and find its name. Them go back to the Appearance tab and look for that name.

Customization and Personalization

Don’t want your blog to look like someone else’s? Some themes offer additional configuration options on the dashboard, including ways to change pictures, logos, and fonts. Each theme offers at least one way to customize it by manually overriding its CSS (Cascading Style Sheets). This “Custom CSS” option is not for everyone, and requires some knowledge of the way CSS is used to “style” HTML. But if you find a theme that you really like, but don’t like the background color or the font, you can use this method to modify it to your liking.

Creative Commons License

Environment: Reclaim Dev

Branch: 2.5.x

Skip to toolbar